Building a Self-Hosted DNS Server To Streamline My Workflow
1 . Context
When I wanted to start building my home lab shortly after graduating from trade school in mid 2025, I was a lot less interested in trying to create the largest or most elaborate cluster possible than I was in building something simple that I would genuinely use. I wanted my lab to remain simple, inexpensive, and purposeful, with each component supporting my daily workflow & understanding of networking.
This led me to prioritize two goals:
- Building network services around practical uses that complement my daily routine and workflow.
- Self-hosting those services where doing so gives me greater privacy, control, and flexibility.
It was from this mindset that I came to realize DNS is both a simple, but immensely powerful protocol that could support both of these goals in ways I had not initially considered. Beyond standard ad and domain filtering, I found a way for it to be adapted and automated around my own personal productivity workflow.
This post aims to demonstrate how DNS functions in my own home lab & how it can be setup and automated as a tool that can be used daily to enhance and contribute towards productivity habits.
2 . Network
This project is built on my home network, which serves both as functional infrastructure and as an environment for hands-on networking practice. I regularly adjust its design as I experiment with new concepts, but aim to keep the overall setup simple, reliable, and useful in my daily life.
2.1 Components
-
Cisco Catalyst 3560-CX Switch (Layer 3 Switch)
- Provides VLAN segmentation & Inter-VLAN routing
- Handles DHCP relay, QoS, and ACLs to keep management and client traffic separate
- Functions as the default gateway for all VLANs
- Implements other technologies like SSH, port security, and DHCP snooping
-
Lenovo ThinkCentre Mini PC (Media & Storage Server)
- Locally hosts a self-hosted media server (Jellyfin)
- Provides centralized storage for personal files + media
- Accessible via SFTP for file transfers
- Connected to the Media VLAN for high-speed streaming
- Configured as a centralized syslog node for monitoring
-
 Raspberry Pi #1
(DNS & DHCP Server)
Raspberry Pi #1
(DNS & DHCP Server)
-
Raspberry Pi #2
(TV Client)
- Runs Kodi as a frontend media client
- Connects to the media server via the Media VLAN
- Allows for content consumption without depending on proprietary ecosystems
-
Raspberry Pi #3
(VPN & Utility Server)
- Hosts a WireGuard VPN for secure SSH access
- Runs SFTP/OpenSSH for file transfer & remote management
- Provides a TFTP service for Cisco firmware updates & config backups
- Placed in the Management VLAN
-
ISP Home Gateway
- Provides WAN connectivity
- DHCP for wireless clients
-
Extras + Misc. Equipment
- External hard drives for storing files & media
- Standard CAT6 cables, terminated by me
- PDU
For more specific details regarding how I make use of these services in my workflow, I have a post here detailing how I have them integrated.
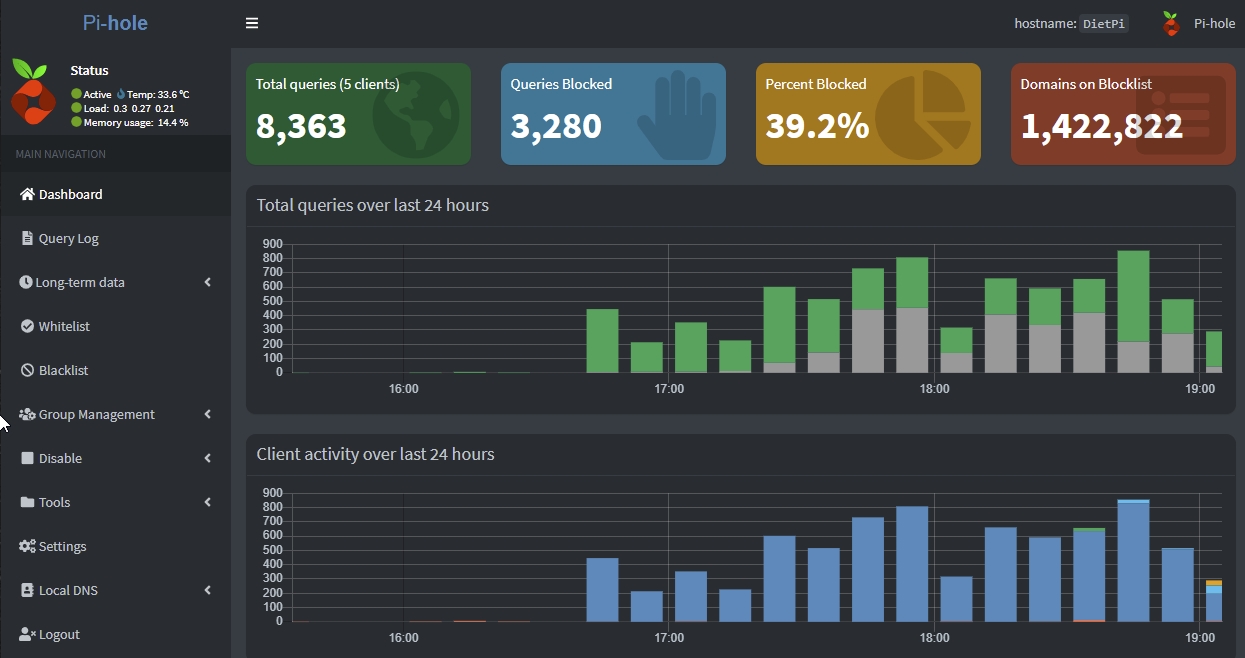
3 . Pi-hole Configuration & Purpose
Pi-hole is the service that I host for providing DNS control in my network. It operates as a network-wide DNS server that intercepts queries from connected devices and applies filtering rules in real time. Some key benefits include:
- Network-wide ad-blocking & privacy protection.
- Custom blacklisting (including based on VLAN/client devices)
- Block proprietary trackers & telemetry on home smart TVs.
- Centralized DNS monitoring by logging queries & generating associated statistics.
- Can be used as a DHCP server, dynamically assigning DNS.

3.1 Why I Use Unbound
To avoid reliance on third-party DNS providers and maximize privacy, I pair my Pi-hole configuration with Unbound - a recursive, caching DNS resolver. Using Unbound allows my setup to query root DNS servers directly, instead of forwarding requests to external upstream providers.
While Pi-hole provides control over DNS filtering, it still relies on an external upstream resolver by default. Using Unbound allows me to resolve queries recursively within my own infrastructure, giving me greater control over the complete DNS-resolution process.
Using Unbound grants my network with:
- Privacy-first architecture
- DNSSEC validation
- DNS-Over-TLS
- Full control over the resolution chain
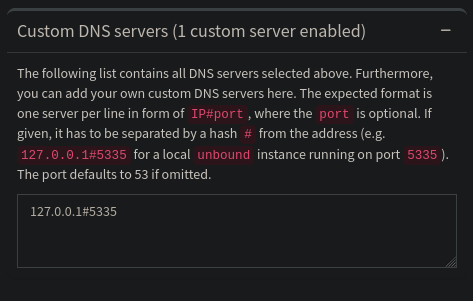
Pi-Hole uses loopback (127.0.0.1#5335)
This forwards all queries to unbound running on localhost
3.2 Workflow / DNS Segmentation
The ability to create different filtering policies was what initially drew me to Pi-hole. Rather than applying the same blocklist at all times, I can tailor DNS filtering to whatever I am doing and automate when each policy takes effect. I currently use the following groups:
- Work - Blocks distracting websites to help me remain focused throughout the workday.
- Study - Similar to Work, but maintained separately so its restrictions can be adjusted around what and how I am studying.
- Leisure - Blocks sites I do not want occupying my free time, including both work-related resources and platforms that encourage passive consumption.
- Baseline - Always active. Provides general advertisement, tracking, and malicious-domain filtering using maintained public blocklists. (As of 9-22-2025: there are 800,000+ domains blocked)
- Unrestricted - Disables all restrictions. (Rarely used)
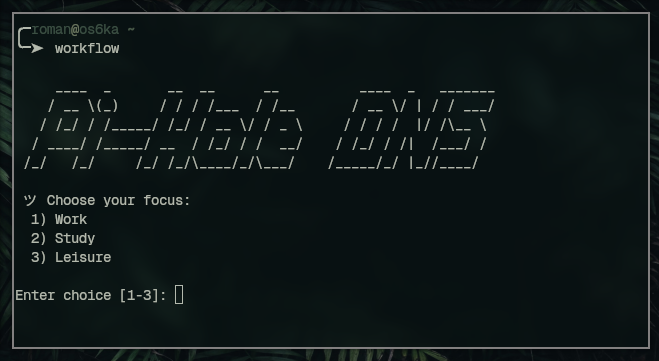
3.3 SSH & Custom Scripts
To streamline management, I developed a set of custom shell scripts that sit on the Pi-hole server & client-side scripts that stay synced to my Linux devices. They are configured to be executed over SSH.
Workflow selection script
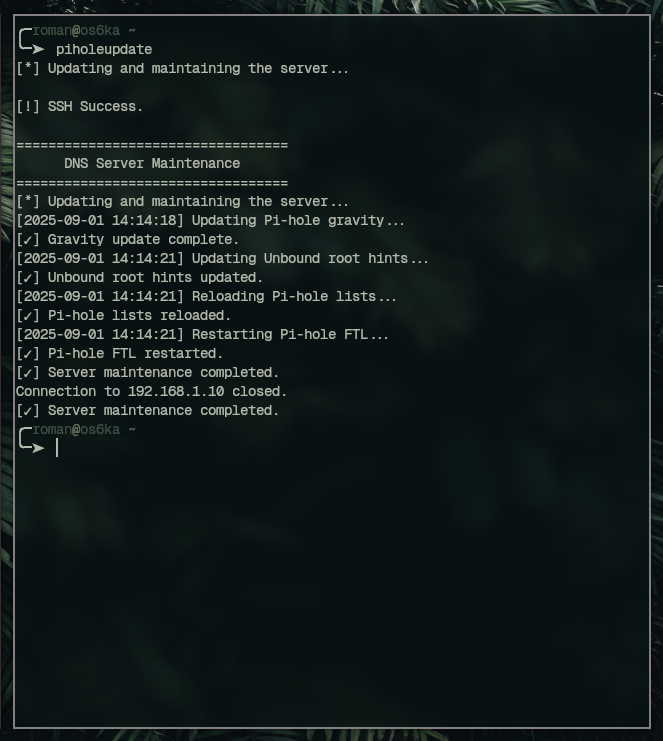
Updater script interface
DNS statistics checker
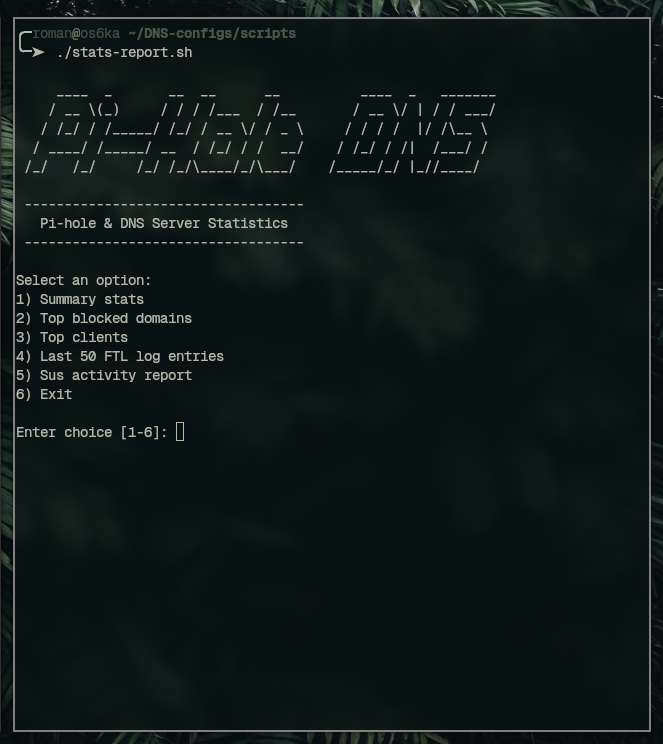
The source-code for these are all hosted on my GitHub repository.
These allow me to not need to jump between devices constantly & let me perform maintenance tasks on Pi-hole remotely.
3.4 Repository Overview
I began using Git early in this project to version my scripts and configuration files, synchronize them across devices, and keep a record of changes as the DNS stack evolved.
Because home-lab configurations can often contain sensitive info, I only publish files that I know are safe to share. Because of this, most of my broader home-lab repositories remain private, but the reusable parts of this project are available publicly in the roman-dns-stack repository. This allows others to adapt the project for their own environments while I continue refining it.
The repo contains all of my scripts, blocklists, unbound, some screenshots and a few txt & markdown documents.
Example - baseline.txt
This file links to all of my adlists, put under the "baseline" group in Pi-hole. I'm using adlists from Hagezi + StevenBlack for my specific setup.
4 . How This Effects My Life
Now that I have covered the project’s technical implementation, I want to explain how it fits into my daily workflow and the practical benefits it provides.
4.1 Staying On Task
Before every work session, I make sure that I run my
workflow
script to set my group to "Work" along with
pacman -Syu
to synchronize my linux packages. I can then use
piholeupdate
to sync my pihole settings (officially applying them) and start the session.
Whenever I'm in this mode, the process is pretty self-explanatory: Anytime I'm distracted, I'm quickly confronted with the restrictions I put in place, and can't access any distracting sites.
This helps not only with not using the blacklisted sites but also enforces:
- Not falling into algorithmic pipelines & feedback loops, even if I'm using said site for a singular purpose.
- Forces me into starting work faster & getting into flow as soon as I begin.
Another advantage of this setup is being able to integrate some of the standard features offered by programs like Cold Turkey, a productivity-focused website blocker, directly into my own network infrastructure. Keeping the system self-hosted allows its filtering policies to work alongside my existing DNS, VLAN, and firewall configuration while remaining independent of a particular operating system or subscription service.
It also gives me opportunities to experiment with related technologies and configurations:
- Scheduled automation — Cron jobs can activate filtering policies at specific times.
- Platform-independent filtering — DNS policies can apply to any connected device, regardless of its operating system.
- VLAN-based policies — Devices can be separated and assigned rules appropriate to their purpose.
- Port and protocol filtering — Firewall rules and ACLs can supplement DNS filtering for applications that cannot be managed reliably through domain-based rules alone.
VLAN segmentation prevents my personal filtering policies from interfering with other users or clients on the network. More broadly, the project gives me a practical environment in which to apply my networking knowledge while reducing my reliance on proprietary applications and subscription-based services.
4.2 Leisure Time + Media Consumption
In the book Digital Minimalism by Cal Newport, he outlines a concept he calls high-quality leisure: activities that are satisfying, mentally engaging, and personally meaningful. He contrasts these with lower-quality digital activities that encourage passive consumption and fragment our attention (I.E doomscrolling).
The goal in achieving high-quality-leisure is pretty simple: to reclaim time, attention, and mental energy within our free time and create space for more fulfilling and purposeful experiences.
This was the motivation behind my "Leisure" blocklist. Rather than removing every restriction outside of work or study, Leisure mode blocks platforms that I do not want occupying my free time. It also limits access to work-related sites, helping me avoid slipping back into work mode when I intend to rest. The goal is not to make every moment productive, but to make my leisure more intentional.
This plays into why I decided to start using Jellyfin + Kodi as well. Not only is it a highly customizable ecosystem that can be catered towards my preferences and experience, but allows me to jump right into whatever content, movies, and TV shows I'd like to enjoy without ads & being connected to the internet.
Additionally, I’ve recently developed a habit of writing notes and journaling about themes, quotes, and other details I pick up on while watching new movies or TV shows. I also record sentences and timestamps from foreign-language media so I can revisit them later for sentence mining. These practices have been extremely helpful in making the process of watching media more attentive and engaging without turning it into another form of work for me.
4.3 Conclusion
This project has been a simple and enjoyable way to apply scripting, networking, and DNS to my daily life. It is also my first blog post documenting part of my home lab. If you would like to learn more about how the rest of my lab supports my daily routine, I plan to explore it in greater detail here. If you took the time to read this or learned something useful from it, thank you!
Roman Todd - 09-22-25